01 // CONNECTION
Connect in three steps
HDMI SOURCE→DR HDMI INPUT→DR HDMI OUTPUT→TV / AVR / PROJECTOR
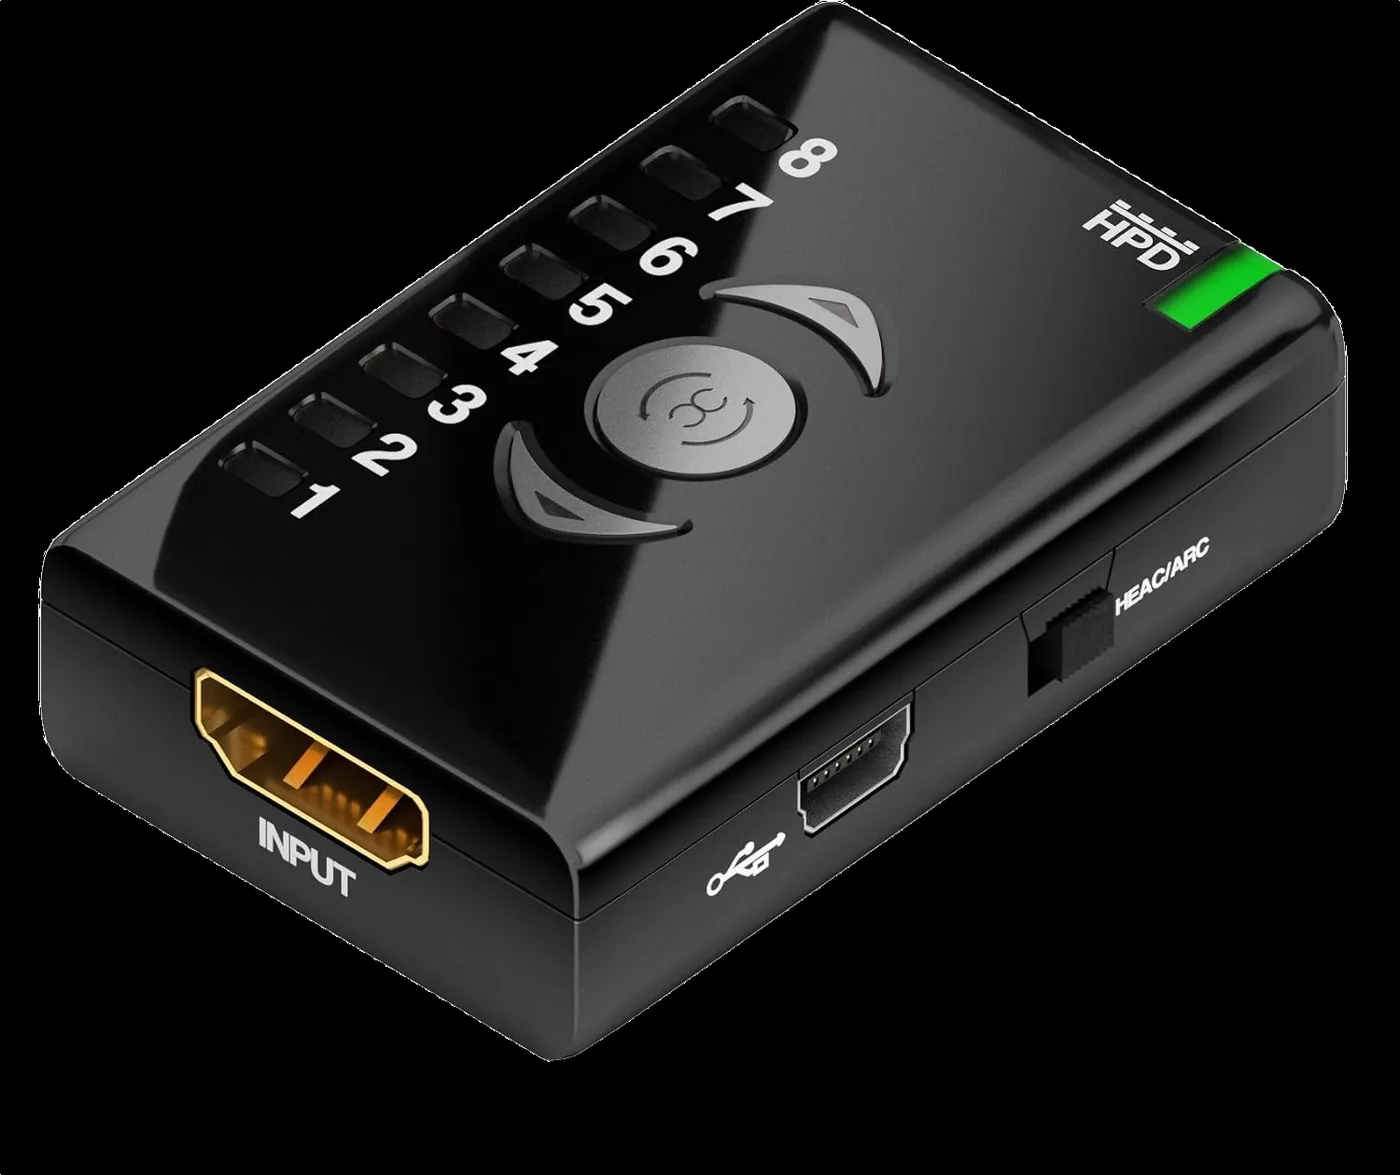
Connect the HDMI output of your source to INPUT. Connect OUTPUT to the next link in the chain: a display directly, or for example a receiver, splitter or projector installation. The Dr HDMI can normally be powered via HDMI; USB can supply power as well.
Start simple. When something fails, first test with a short, known-good HDMI cable and as little equipment in between as possible. Dr HDMI can solve EDID/handshake problems, but it cannot repair a faulty cable or port.
02 // CONTROL
The three buttons
Use ▲ and ▼ to select one of the eight EDID banks. As soon as you stop on a bank for about a second, the Dr HDMI activates that EDID and generates an HPD event. This tells the source that the capabilities have changed, and the source reconfigures its HDMI output. The HPD event takes about two seconds; you cannot change the EDID during that time.
The middle button has a different function: it reads the EDID of the connected display, stores it in bank 8 and activates bank 8. This is also followed by an HPD event of about two seconds.
Banks 1 to 5 are factory presets. You cannot change them yourself, but HDfury can update them with a firmware update.
03 // EDID BANKS
What do banks 1 to 8 do?
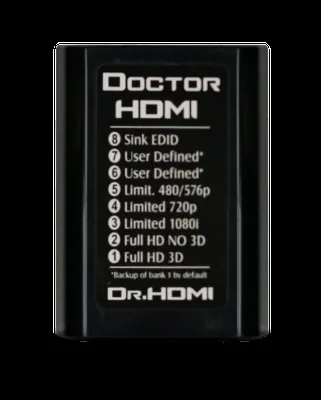
1Full + 3DFull capabilities, including 3D.
2Full, no 3DFull profile without 3D.
31080i limitMaximum 1080i, no 3D.
4720p limitMaximum 720p, no 3D. A handy safe diagnostic step.
5480/576pConservative SD mode for older equipment.
6User definedEDID programmable with the Windows software; same as bank 1 from the factory.
7User definedSecond programmable EDID bank; same as bank 1 from the factory.
8Sink EDIDEDID copied from the connected display.
04 // SINK COPY
Copying your display's EDID
Make sure the display and HDMI chain are connected correctly and active. Then press the middle button. The Dr HDMI reads the sink's EDID, stores it in bank 8 and activates bank 8. Another HPD event follows.
05 // TROUBLESHOOTING
No picture? Diagnose systematically.
Start at bank 4 (720p). If you get a picture, move to bank 3 and then to bank 2 or 1. This raises the advertised capabilities in a controlled way. If a particular step breaks the connection, you know much better where the compatibility limit lies.
No picture after standby? A fixed EDID can stop the source from changing its HDMI configuration when a display or receiver drops out. Re-activate a bank to deliberately force a new HPD event.
With a PC that keeps re-detecting displays, an AVR/projector chain or a splitter with different displays, the goal is the same: show the source a stable set of capabilities.
06 // USB
Custom EDID and firmware
Banks 6 and 7 can be programmed via Mini-USB with the Windows EDID Utility. HDfury's official download section offers the firmware 2.1 + EDID Utility 1.0 package (6 January 2018), the stand-alone EDID Utility 1.0 and Silicon Labs USB drivers. A firmware update is sent to the device with a single .exe file; no additional software is needed. Only use software for the original Dr HDMI; software for the 4K and 8K models is not interchangeable.
Open the Dr HDMI Download Center →
07 // PIN 14
HEAC/ARC compatibility switch
The switch on the side turns HDMI pin 14 on or off. HDfury lists it as an extra compatibility option for handshake problems. If the normal configuration doesn't work, you can test both positions and let the chain renegotiate.
08 // UNDER THE HOOD
What happens technically?
EDID tells the source which video and audio modes the chain accepts. The Dr HDMI filters the EDID requests on the DDC line and presents the selected EDID, while HDCP handshakes are passed through. HPD then tells the source to read the capability information again.
The original Dr HDMI is HDMI 1.4a and, according to HDfury, supports single-link 225 MHz, 2K, WUXGA 1920×1200 and 1080p60 up to 12-bit Deep Color, with a specified video bandwidth of 2.25 Gbps. It is therefore not a 4K120/8K/VRR device.
09 // WIRING LAB
Visual wiring diagrams
The Dr HDMI belongs in the HDMI signal path between the source and the device whose EDID relationship you want to stabilise. Preferably start as simply as possible and only then add an AVR, splitter or extender.
PC / HTPC → display
PC / GPUHDMI output
→DR HDMIfixed EDID / HPD
→TV / monitorsink
Suitable when a computer rearranges its display configuration after the display is switched off or changes input. The Dr HDMI can keep offering the source a consistent EDID.
Source → AVR → projector
Sourceplayer / console / PC
→DR HDMIEDID control
→AVR → projectordownstream chain
A useful test position when the source struggles with the capabilities of a longer AVR/projector chain. Then test another position in the chain if needed to find out where the handshake becomes unstable.
Source → splitter / extender
SourceHDMI
→DR HDMIcommon profile
→Splitter / extendermultiple sinks
Choose an EDID that is within the capabilities of all connected displays. A conservative bank is often more useful for diagnosis than going straight to the maximum profile.
Capture the EDID of one display
Sourcenot important for now
→DR HDMI · BANK 8press the middle button
→DisplayEDID is read
The middle button copies the downstream EDID to bank 8, activates that bank and then triggers an HPD event.
10 // BANK SELECTOR
Which EDID bank should you choose?
1Full + 3DFor a chain that can handle the full factory EDID including 3D.
2Full, no 3DFull profile when 3D is not wanted or not needed.
31080i limitLimit the source to 1080i maximum; useful with older equipment.
4720p limitA good, safe diagnostic bank when higher modes cause problems.
5480/576pVery conservative profile for older or problematic chains.
6User EDID AYour own EDID via the Windows Utility.
7User EDID BA second custom profile for another installation or test.
8Sink copyExactly the EDID you read from the connected sink with the middle button.
No picture?Start with bank 4. If 720p works, try 3 and then 2/1. That way you locate the limit in a controlled manner.
Display works normally?Copy the working display EDID to bank 8 if you want to hold on to exactly those capabilities.
Fixed installation?Use bank 6/7 when you need a specific, custom-built EDID profile.
11 // REAL-WORLD SETUPS
Practical installations
A PC that "forgets" a display
Place the Dr HDMI directly after the GPU. Select a suitable fixed bank or capture the display into bank 8. The goal is for the computer to keep seeing the same EDID, even when downstream equipment changes temporarily.
AV receiver with projector
Start with the simplest connection and check every step. If source → projector works directly but not via the AVR, place the Dr HDMI before the AVR and test a conservative EDID. If that works, raise the bank step by step.
Matrix, splitter or different displays
The source can only follow one offered capability set. So choose a profile that is supported by the entire intended chain. Banks 6/7 are especially interesting when an installer wants to build a fixed common EDID.
Long HDMI run
HDfury specifies input cable equalization and up to 50 metres of cable loss compensation. Treat this as an installation-dependent capability, not a guarantee for every cable combination. Test cables, couplers and active equipment separately.
HDMI 1.4aoriginal model
225 MHzsingle-link video
2K / WUXGA+ 1080p60
8 banks5 + 2 + sink copy
12 // FIELD CHECKLIST
Installation and diagnostic checklist
Check the model.
This manual is for the original Dr HDMI with 8 banks, not the Dr HDMI 4K or Dr HDMI 8K.
Test source and display directly.
First confirm that both devices and a short HDMI cable work without extra equipment.
Place the Dr HDMI inline.
Source to INPUT; OUTPUT to the downstream chain.
Check the power.
The unit can be powered via HDMI; use USB when the HDMI power seems insufficient or unstable.
Choose a diagnostic bank.
Bank 4 is a practical conservative starting point. After activating it, wait until the HPD cycle has finished.
Build up the quality.
Then try bank 3 and then 2/1. Note at which step the behaviour changes.
Test bank 8.
If the display itself works fine, copy its EDID with the middle button and test the stored sink EDID.
Test HEAC/ARC if needed.
For stubborn compatibility issues, try the pin 14 switch in the other position.
Add equipment back one by one.
Only add the AVR, splitter, extender and long cables once the basic connection is stable.
Use custom EDID deliberately.
Banks 6/7 are powerful, but note which parameters you change so you can undo them.
The Dr HDMI manages EDID and HPD and passes HDCP, among other things, through; it does not make a non-HDCP-compliant display HDCP-compliant and does not repair a physically defective HDMI port.
